
Manly Exercises. The Broadsword and Single-Stick. Part III.
Continued from PART II.

THE BROADSWORD AND SINGLE-STICK.
III.
THE TARGET.
THE first thing to be done is to construct a target for ourselves. Procure a stout sheet of cartridge-paper, about four feet square; lay it upon a table, and proceed to describe a large circle upon it as follows:—Insert at the central point, marked O in our illustration, a strong drawing-pin, or, still better, a small brad-awl; tie upon this a piece of string about twenty-four inches in length. Upon the other end of the string affix a pencil; draw the string tight, so that it shall correspond with the line coming from the centre and reaching the circle, at the point marked “cut 7” in our drawing of the target. Keeping the string tightly drawn out, describe a circle upon the paper; next remove the string, and with a straight piece of wood draw the lines from the centre to the edge of the circle precisely as they occur in our illustration. When you have drawn the circle and the black lines which converge from it to the centre, go over them with a brush filled with red paint. You have now the dotted lines to fill in; and as these are to be less prominent than the former, you will fill them in with thin lines of a green colour—of course drawing them in the exact positions given in Fig. 1. To complete our target, we must draw in, at one end of each of the green lines, the hilt of a sword. Your target is now complete; and at a glance you will see that the thick black lines denote the seven “cuts;” and that the thin green lines, with a sword-hilt attached to them, mark the inclination of the seven “guards.”

[Editor’s note: As the above illustration is nearly illegible, reproduced below is a nearly identical target, published in Abstract of cavalry movements: intended for the use of the volunteer corps of Upper and Lower Canada. ([Montreal]: 1839)].

WHERE TO PLACE THE TARGET.
The target may be fixed in any spot which will afford plenty of space wherein to execute the positions, guards, &c. A garden or a field will serve your purpose perfectly. If you choose a garden, the wall, or if a field, a tree, will form a support for your target, which is to be fixed so as to have its centre o about the height of your breast. From below that centre a line is to be drawn upon the ground, directly in front and at the distance of about ten feet, whereon you most take your stand in the position of “ATTENTION,” with your left heel on the line, so that when you turn to the “FIRST POSITION” your right foot may cover it.
EXPLANATION AND USE OF THE TARGET.
In our illustration you will perceive there are seven cuts and guards. The “cuts” are directed through the centre, distinguished by lines, and named according to that number from which each cut commences. The “guards” are executed by holding your stick opposite to, and in the direction of, the dotted lines of our drawing and the green ones of your target. You must be exercised in performing every cut and guard in exact accordance with the lines drawn upon the circle; and there must be no variation in your practice until you have gained the proper direction of the cuts as well as the inclination of the stick and position of the wrist in forming the “guards.” You must, however, remember that the target merely directs you how to form the “cuts” and “guards,” not precisely where, as that will depend upon how your adversary acts when attacking you. The cuts 1, 3, and 5, may be directed at any part, from head to foot, on the left; and the cuts 2, 4, and 6, equally so on the right; the former being termed “inside,” and the latter “outside” cuts. One, three, and five, are the corresponding “Inside guards;” and two, four, and six, the “Outside guards.” You will now perceive that your target is a sure guide and reference for correctly forming the guards, and giving a proper direction of the edge in executing the cuts.
When you have thoroughly mastered all the cuts and guards, you may take your stick in hand. But let us first of all become acquainted with its strong and weak parts. The Fort (strong) is the half of it near the hilt; the Foible (weak) the half towards the point. A knowledge of these distinctions is very material either in giving or guarding a cut; and much depends upon their proper application. From the hilt upwards, in opposing your adversary’s stick, the strength of the defence decreases in proportion as the cut is received towards the point; while, on the other hand, it increases from the point downwards.
Always seek to gain your opponent’s Foible with your own Fort. All your cuts should be given within eight inches of the point, so that your stick may clear itself. When delivering a cut always seek your adversary’s Foible, as that will, as a matter of course, force his guard.
STICK PRACTICE
commences with the order,
“DRAW SWORDS.”—Seize your stick with your left hand, just below the hilt, which should be raised as high as your hip; bring your right hand smartly across your body, grasping the stick at the hilt, and turning it at the same time to the rear; raise your hand the height of your elbow, your arm being close to your body. Now draw the stick through your left hand, as though you were drawing a sword from its scabbard, by extending your arm, the edge being to the rear; lower your hand until the hilt falls just below your chin, the stick perpendicular, the edge to the left, with your thumb extended on the side of the handle, your elbow close to your body. This forms the position, “RECOVER SWORDS.”
Lower your wrist below, and in line with, your right hip, your elbow being drawn back, your arm extended as much as can be done with ease; your hand lightly grasping the stick, but prepared, by a contraction of the fingers, to resume a firm hold. The upper portion of the stick will then be in the hollow of your right shoulder, with its edge to the front; or, in other words, the position of “CARRY SWORDS.”
When the stick is drawn, your left hand falls into the position of “ATTENTION.” At the order, “SLOPE SWORDS,” bring your hand to the front, in line with your elbow, which must fall close to your body; the stick resting upon your shoulder, its edge to the front.
At the order, “RETURN SWORDS,” carry the hilt to the hollow of your left shoulder (bringing your left hand to your side, as though in the act of raising the scabbard of your weapon), with the stick perpendicular; the back of your hand to the front. Next, by a quick turn of your wrist, drop the point of the stick as if it were about to enter the scabbard, turning the edge to the rear until the hand and elbow are in line with each other, square across your body.

At the order, “TWO,” press the stick down into your left hand until the hilt touches the thumb and forefinger.
At the order, “THREE,” bring your hands to the position of “ATTENTION.”
At the order, “DRAW SWORDS,” act as previously directed.
At the order, “SLOPE SWORDS,” execute the motion already described.
At the order, “PREPARE FOR SWORD EXERCISE,” turn your body and feet to the “FIRST POSITION;” your left hand resting upon your hip, the thumb to the rear. (See Fig. 2.)
At the order, “RIGHT PROVE DISTANCE,” “RECOVER SWORDS” with your forefinger and thumb stretched along the hand, your thumb being upon the back, and the end of the hilt in your right palm.
At the order, “TWO,” extend your arm to the right, and lower your stick in a horizontal direction from the shoulder; its edge to the rear; your left shoulder square to the front.
At the order, “SLOPE SWORDS,” act as before directed.
At the order, “FRONT PROVE DISTANCE,” elevate your stick as before; then step smartly out to the “THIRD POSITION,” and extend your arm—lowering the point of your stick towards the centre of the target, with its edge to the right. (See Fig. 3.)

At the order, “SLOPE SWORDS,” act as previously directed.
At the order, “ASSAULT,” elevate your arm to the front, with your wrist opposite No. 1, your elbow rather bent towards the centre of the circle, the back of your stick resting on your shoulder, near the point, with the edge inclined to the right.
At the order, “ONE,” extending your arm, direct the cut to the front, diagonally, from right to left, as marked on the target from 1 to 4; and as the point clears the circle turn your knuckles upwards, and continue the sweep of the stick so as to bring the point to the rear of the left shoulder, upon which it rests with its edge inclined to the left, and your wrist opposite No. 2.
At the order, “TWO,” direct your cut from 2 to 3, and turn the wrist so that your stick continues its motion until the point is below your right hip, the edge downwards, your elbow bent inwards, and wrist towards 2.
At the order, “THREE,” cut upwards in a diagonal line from 3 to 2; and continue the motion of your wrist until the point of the stick is below your left hip; the edge downwards; your elbow bent and elevated, with the wrist towards 1.
At the order, “FOUR,” make a cut upwards, in a diagonal line from 4 to 1; and turn your knuckles downwards, with the edge of the stick to the right, and the point to the rear, over the right shoulder; your elbow bent, your wrist towards 5.
At the order, “FIVE,” make a horizontal cut from 5 to 6, and turn the knuckles up, with the edge of the stick to the left, and the point to the rear, over your left shoulder; your elbow bent, your wrist turned towards 3.
At the order, “SIX,” make a horizontal cut from 6 to 5, and bring your hand in the direction of 7; your sword being on the same line, over the head; its point lowered to the rear, its edge uppermost.
At the order, “SEVEN,” cut down vertically from 7 to the centre of the circle, and remain with your arm extended; placing your thumb along the back of the handle; your left shoulder pressed well back.
At the order, “DEFEND,” take the “FIRST GUARD” by turning the edge of your stick to the left, your thumb resuming its grasp of the handle, and draw in your elbow close to the body; your wrist being kept to the front, and your stick placed opposite the dotted diagonal line shown on the target from the hilt, marked “FIRST GUARD.” In this and the succeeding guards, distinguished as “SECOND,” “THIRD,” &c., the point should be advanced rather to the front, your left shoulder being well kept back in the guards to the left, but rather brought forward in those to the right, as also in the “SEVENTH GUARD.”
At the order, “SECOND,” turn your wrist with your knuckles uppermost, and the edge of the stick to the right, your stick being placed opposite the diagonal line marked “SECOND GUARD.”
At the order, “THIRD,” turn your wrist and edge to the left, nearly as high as your shoulder, with the point lowered to the right, the sword placed as marked, “THIRD GUARD.”
At the order, “FOURTH,” elevate your elbow, and turn your wrist and edge to the right, with the point to the left, precisely as shown in the target, marked “FOURTH GUARD.”
At the order, “FIFTH,” turn the edge to the left, with your wrist as high as your shoulder to the front and left of your body, the stick being placed opposite the perpendicular line, marked “FIFTH GUARD.”
At the order, “SIXTH,” bend your wrist, and turn the edge of your stick to the right, so as to bring it opposite the perpendicular line, marked “SIXTH GUARD.”
At the order, “SEVENTH,” elevate your wrist above, and in advance of, your right ear, your elbow up and kept well back, your stick in the direction marked “SEVENTH GUARD.”
At the order, “PARRY,” lower your wrist nearly close to your right shoulder, the edge of the stick to the right, your hips well pressed back, and with the hilt of your weapon opposite 1.
At the order, “SECOND MOTION,” turn your wrist so that your stick-point falls towards the left rear, and, forming a circle from left to right of your body, resumes its former position.
At the order, “SLOPE SWORDS,” proceed as before directed. The SEVEN CUTS should also be gone through in the following manner:—
At the order, “ASSAULT,” they should be combined in regular succession without any material pause between each, or, by a proper and neat turn of the wrist, the cuts will lead into each other. The cuts should be given with force, with the edge leading forwards, the wrist retaining its direction to the front as much as possible; and in returning to prepare for another cut, the edge should be drawn back in nearly the same line, your arm being slightly bent, so as to allow free play to your wrist, elbow, and shoulder, in giving due effect to the force of the cut, and then extended to the utmost in the delivery of it.
In order to enable you to carry the edge well in making the assault, you should practise a combination of the cuts one and four, repeating them several times, as well as two and three, five and six, taking care that the edge leads in the respective lines of the target, your wrist being darted towards the centre in each cut.
We have now to study the GUARDS.
At the order, “GUARD,” advance the point of your stick, extending your arm towards the centre of the target, with the edge downwards. Next, without pause, bending your body, drawing in your chest and neck, and bringing your left shoulder a little forward, step out smartly to the “SECOND POSITION,” with your elbow bent and raised, so as to have your hand nearly above the right foot; the edge of the stick turned upwards, with the point lowered and inclined to the left, the target distinctly seen within the angle formed by your arm and stick, the hilt being inclined to 1, and the point directed below and to left of 4. (See Fig. 4.)

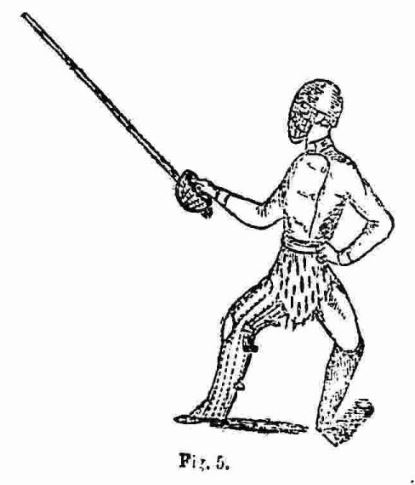
At the order, “INSIDE GUARD,” elevate your head and body, lowering your wrist, with the knuckles down and over the foot, the point of the stick to the front, its edge to the left, your hand as low as the elbow, a little above, and in front of your hip, at the same time making the “SINGLE ATTACK” according to the directions already given. In this position your wrist must be inclined towards 4, and the point of the stick towards 1. (See Fig. 5.)
At the order, “OUTSIDE GUARD,” turn your wrist, with your knuckles upwards, and the edge of the stick to the right, repeating the “SINGLE ATTACK,” your hand inclining to 3, your stick-point directed towards 2. (See Fig. 6.)

As merely playing at cuts and guards with the sticks, without any definite intention, would be only so much waste of time, we will now append a course of combinations of those best calculated to advance the young broadswordsman in his attempts to gain a mastery of the art.
COURSE OF STICK-DRILL AND POSITIONS.
Execute in the following order:—Cut One and Third Position; First Guard and First Position ; Cut Two and Third Position; Second Guard and First Position; Cut Three and Third Position; Third Guard and First Position; Cut Four and Third Position; Fourth Guard and First Position; Cut Five and Third Position; Fifth Guard and First Position; Cut Six and Third Position; Sixth Guard and First Position; Cut Seven and Third Position; Seventh Guard and First Position. Guard according to directions already given; Slope Swords according to directions furnished above.
SECOND COURSE.
Guard, as already directed; Inside Guard, as already directed; Outside Guard, as before directed. The whole of the following cuts are to be given in the Third Position, after which you must, in every case, spring up to the First Position in forming the Guard. Cut Two and Second Guard; Cut Three and Third Guard; Cut Four and Fourth Guard; Cut Five and Fifth Guard; Cut Six and Sixth Guard; Cut Seven and Seventh Guard; Slope Sword according to directions already given.
THIRD COURSE.
Deliver the Outside and Inside Cuts from one to six, returning to Guard after each Cut; all the Inside Cuts to be given from the Outside Guards (see Fig. 6), and all the Outside Cuts from tho Inside Guard. (See Fig. 5.) In order to enable the young broadswordsman to form more readily and effectively any defensive position, the drill-instructor for the time being should practise him in making any cut and guard he may command, such cut and guard to be required out of the regular order. For example, instead of requiring him to execute the cuts and guards from one to seven in succession, he will give the word of command—Cut 3, cut 6, cut 1, cut 5, and so forth.
[Transcribed and edited by Ben Miller, 2017]
Continue on to PART IV of this series.
More vintage articles on self-defense can be accessed on our Resources page.


Trackbacks & Pingbacks